System security is becoming one of the most important issues that IT managers have to deal with. This also applies to IBM i systems. In fact, the days when the only access to systems was via a terminal are long gone. Now systems are at the center of complex ecosystems that communicate with each other in various ways (REST APIs, remote commands, database queries, etc.).
One of the enabling factors for establishing secure communication is undoubtedly the use of SSL/TLS certificates. In a previous post, we saw how to download and import them using DCM or the tools provided by the QMGTOOLS library. For those who don’t know, internet standardization bodies have decided to gradually (but at the same time drastically) reduce the duration of these certificates. Consider that today the standard is about one year for the duration of SSL certificates, while in 2029 the target is to make them last ONLY 47 days…
As you can imagine, if a service uses these certificates and they expire in the meantime, this causes a blockage of services and, consequently, of the business connected to them. This is why it is essential to have a monitoring system that, beyond the expiration date, also provides visibility of the applications affected by the certificate change…
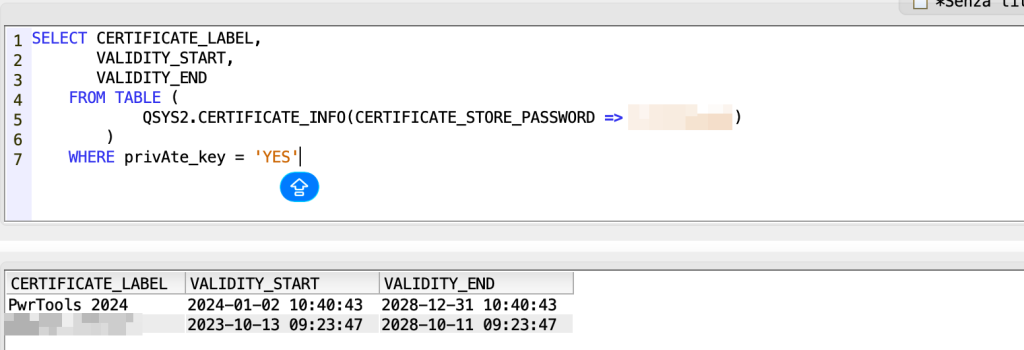
First, let’s extract the list of certificates with private keys (those for server or client applications that require authentication):
SELECT CERTIFICATE_LABEL, VALIDITY_START, VALIDITY_END FROM TABLE (QSYS2.CERTIFICATE_INFO(CERTIFICATE_STORE_PASSWORD => 'XXXXX')) WHERE private_key = 'YES'
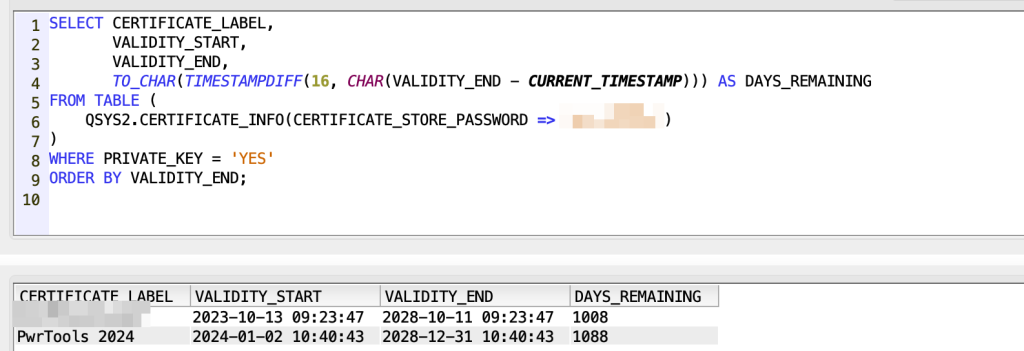
In this way you can also put a where condition on the days between current date and expiration date:
SELECT CERTIFICATE_LABEL, VALIDITY_START, VALIDITY_END, TO_CHAR(TIMESTAMPDIFF(16, CHAR(VALIDITY_END – CURRENT_TIMESTAMP))) AS DAYS_REMAINING FROM TABLE (QSYS2.CERTIFICATE_INFO(CERTIFICATE_STORE_PASSWORD =>’XXXXX’)) WHERE PRIVATE_KEY = ‘YES’ ORDER BY VALIDITY_END;
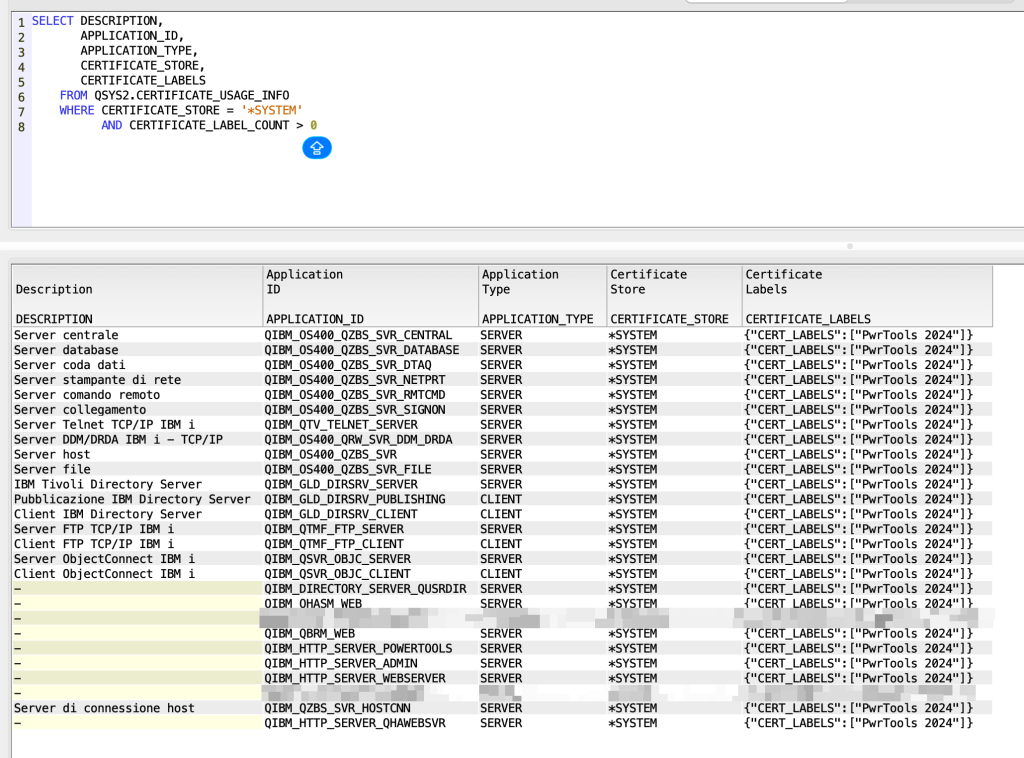
With this query you are able to extract every system service that is using SSL/TLS:
SELECT DESCRIPTION, APPLICATION_ID, APPLICATION_TYPE, CERTIFICATE_STORE, CERTIFICATE_LABELS FROM QSYS2.CERTIFICATE_USAGE_INFO WHERE CERTIFICATE_STORE = '*SYSTEM' AND CERTIFICATE_LABEL_COUNT > 0
Now let’s print the applications and associated certificates:
SELECT DESCRIPTION, APPLICATION_ID, APPLICATION_TYPE, CERTIFICATE_STORE, CERTIFICATE_LABELS, CERTIFICATE_LABEL, VALIDITY_START, VALIDITY_END FROM QSYS2.CERTIFICATE_USAGE_INFO X INNER JOIN TABLE (QSYS2.CERTIFICATE_INFO(CERTIFICATE_STORE_PASSWORD => 'XXXXXX')) Y ON X.CERTIFICATE_LABELS LIKE '%' CONCAT Y.CERTIFICATE_LABEL CONCAT '%' WHERE CERTIFICATE_STORE = '*SYSTEM' AND CERTIFICATE_LABEL_COUNT > 0
And you, do you have any service with SSL enabled and a real certificate monitoring tool?
This week, the wait is finally over… a few weeks after signing up for the demo, BOB has finally arrived, and I have the chance to try it out in advance.
For those who are not yet familiar with it, BOB is a new IDE owned by IBM. It is not a completely new IDE; in fact, for those who regularly use Visual Studio Code, the environment will be very familiar, because BOB is based on it. The reasons for this choice are quite simple to identify. First, compared to RDi, Visual Studio Code is much lighter and more performant, as well as being significantly more modular. Second, Visual Studio Code is a standard IDE, convenient for any programming language. In fact, there are extensions for virtually any language, which makes development on IBM i much closer to industry standards.
Now, if BOB were just a copy-and-paste version of VSCode, it would be useless… The real added value of BOB is its native integration with artificial intelligence. In fact, when you open it for the first time, you immediately notice the prompt for interacting with the agent. In this case, compared to other competitors, the artificial intelligence offered here is based on the aggregation of several models, so you have a complete stack that allows you to respond to very different needs. Moreover, as you can imagine, since BOB is from IBM, it is well-trained in all IBM languages, such as RPG.
Now, let’s talk about my experience… as soon as it arrived, I put it to work on one of my Java projects. It’s actually the backend of an HTTP portal that we use to provide services to our customers. First, I asked it to generate some documentation (yes, I don’t like writing documentation), and in about an hour, it wrote all the javadoc for over 140 classes. In addition to writing the documentation, I was pleased to note that it is able to suggest possible improvements to the code. In this case, for example, it highlighted the possibility of SQL injection:
This is just an example; it also suggests possible code refactoring.
Now, let’s talk about evaluations… We are only at the beginning, and I haven’t been able to test it sufficiently yet, but let’s say that expectations are very high. As for the documentation I asked him to write for me, it seems to be very focused on the subject… I still have some doubts about code generation, but I also believe that it should definitely be an aid (and it is) to the programmer, not a replacement. Another definitely positive thing is that it asks for permission before accessing/modifying a file, showing all the changes in a preview and explaining them. On the other hand, the demo comes with a $20 budget, and I’ve already burned through about $14 just with the documentation I asked for, which means I can’t really test it thoroughly.
From my point of view, the next steps concern the RPG world, i.e., the automatic generation of test cases and code documentation. This is because, in addition to the IDE, it is also possible to invoke BOB’s APIs from the CLI, meaning it can be integrated into automatic compilation/release pipelines.
For completeness, I am attaching the link to sign up for the BOB demo in case you haven’t already done so: https://www.ibm.com/products/bob
Have you had the opportunity to test and use artificial intelligence tools in your work? What do you think?
It is quite common to have customers with specific backup requirements, such as changing the expiration date of the tape used based on the day of the month or year for tax purposes. For this reason, it is always complicated to have standard jobs or calendars with a predefined retention period.
So if a standard approach is not feasible, we go for a custom approach… Now SQL and BRMS come to our aid. In fact, there are several SQL services compatible with 5770BR1, and even more with 5770BR2.
Now, let’s proceed with creating an SQL procedure that modifies the media class, move policy, and retention for the tapes used in the job in which it is launched. Then, let’s extract the queries we need:
Find the current job: select job_name from TABLE (QSYS2.ACTIVE_JOB_INFO(DETAILED_INFO => 'NONE', JOB_NAME_FILTER => '*'))
Find tapes and creation date: select volume_Serial, created from qusrbrm.media_info
Find job that changes a tape: select tmcvsr, TRIM(LPAD(TMJNBR, 6, '0') CONCAT '/' CONCAT TRIM(TMUSER) CONCAT '/' CONCAT TRIM(TMCJOB)) from qusrbrm.qa1amm
Now, let’s create a query that give us serial number and the new expiration date: SELECT VOLUME_SERIAL, CASE WHEN RETENTION <> 9999 THEN TO_CHAR(CREATED + RETENTION DAYS, 'ddMMyy') ELSE 'PERM' END FROM QUSRBRM.MEDIA_INFO INNER JOIN QUSRBRM.QA1AMM ON VOLUME_SERIAL = TMCVSR INNER JOIN TABLE (QSYS2.ACTIVE_JOB_INFO(DETAILED_INFO => 'NONE', JOB_NAME_FILTER => '')) ON TRIM(JOB_NAME) = TRIM(LPAD(TMJNBR, 6, '0') CONCAT '/' CONCAT TRIM(TMUSER) CONCAT '/' CONCAT TRIM(TMCJOB))
So, in our case, we have RETENTION that is a variable that contains the number of days to maintain the tape active, 9999 is a special value that in my case means that the tape should not have an expiration date.
At this point, it’s all very easy. I just have to loop through the result set and run the CHGMEDBRM command with the correct parameters for media class, move policy, and retention.
As usual, you can find the source code for the procedure, download it, and edit it as you wish.
I often find myself in a situation where I have several different systems and need to extract data from all of them by running queries from a single partition. Well, there is a DB2 for i function that allows you to run SELECT SQL on remote machines.
What do we need? First of all, it is essential that the database of ‘remote’ machines be registered in the central system’s database address book. To verify that this is the case, use the command WRKRDBDIRE and, if necessary, add 1 (or use the command ADDRDBDIRE):
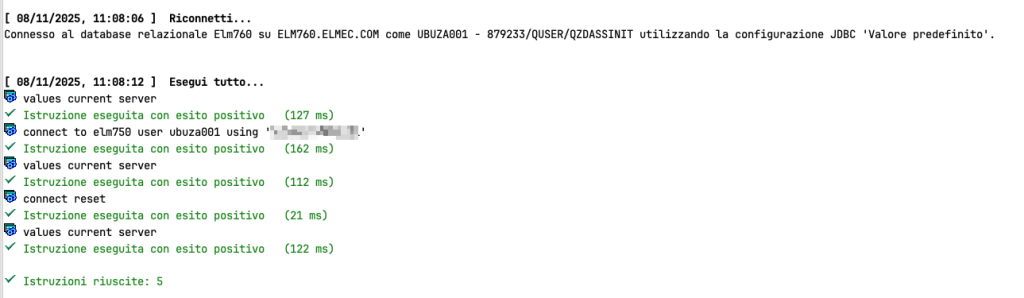
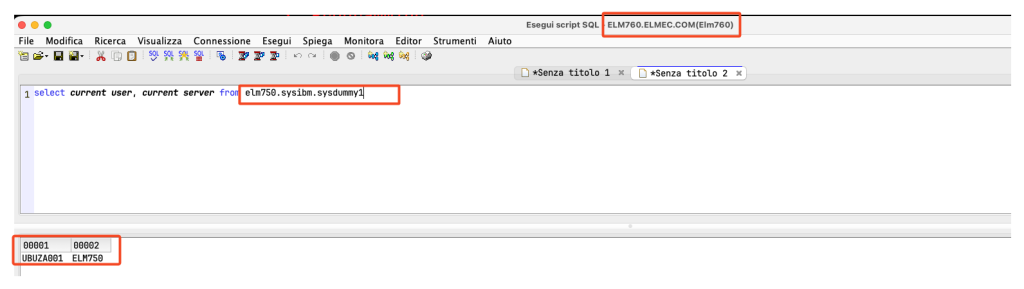
In my example, I am working on the ELM760 machine and trying to connect to the ELM750 machine.
Traditionally, it was already possible to connect from one database to another using the CONNECT TO remote database name statement, but in this case, you opened a stable connection that was closed only when the SQL job was closed or, in general, with the CONNECT RESET statement:
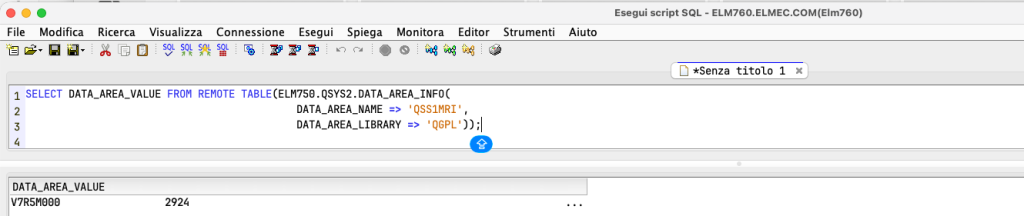
There is another, more convenient way, which is to use REMOTE TABLES. In fact, it is possible to query tables from another system in a single statement. Let’s look at an example:
As you can see, connected to ELM760, I am simply interrogating ELM750. This also works for table functions:
Now, in order for everything to work correctly, it is necessary to define entries at the GO CMDAUTE authentication information level. In this case, it is possible to set up specific authentication for each target lpar or (although I do not recommend this for security reasons) generic authentication for the QDDMDRDASERVER server (clearly only applicable to the user to whom the authentication applies).
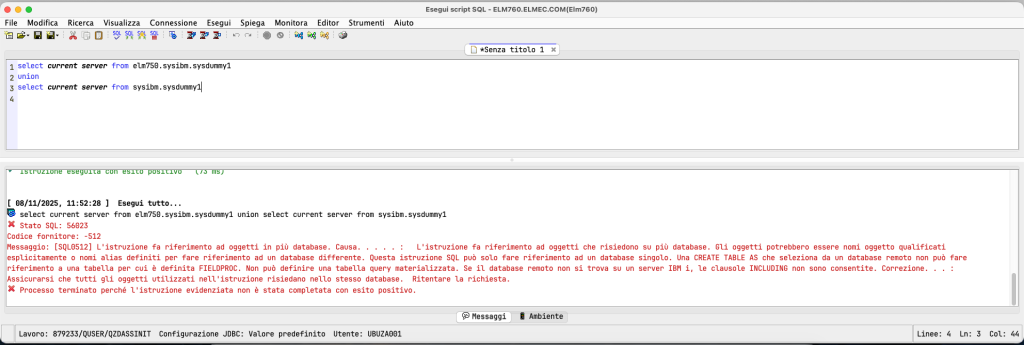
The only structural limitation is the inability to join objects from two different databases, so for example I cannot join (or merge) objects that come from the local database and the remote database:
And you, have you ever tried remote tables in IBM i?
A few days ago, a customer opened a case with me because he couldn’t understand the origin of the locks that were occurring on certain objects. In fact, this lock condition was causing problems for the application procedures, which clearly found the files busy and were unable to operate on them.
There are various solutions to this issue, but the one that seemed most convenient and functional to me was to use our friend SQL.
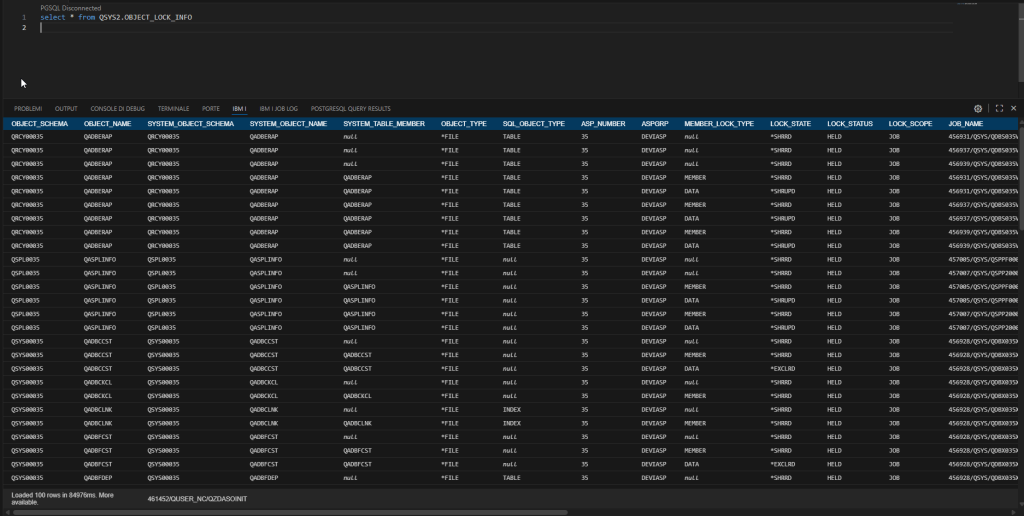
In the tool we will implement today, we will use the QSYS2.OBJECT_LOCK_INFO system view. This view returns a series of very useful information, such as the object being locked, the job that placed the lock, and the type of lock. However, it can also return very detailed information, such as the procedure/module and the statement.
Let’s look at an example of a query on this view without any filters: select * from QSYS2.OBJECT_LOCK_INFO
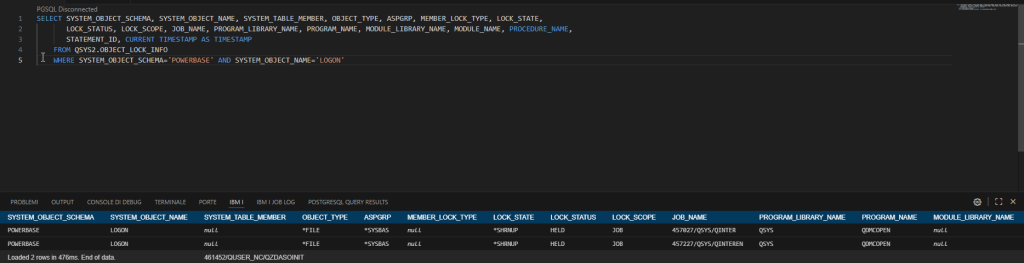
As you can see, it gives us a lot of information. Let’s go back for a moment to the customer’s primary need, which is to understand who placed blocks on a specific object and when, so we’ll start modifying the query. In this case, we’ll take less information, so I’ll select only a few fields: SELECT SYSTEM_OBJECT_SCHEMA, SYSTEM_OBJECT_NAME, SYSTEM_TABLE_MEMBER, OBJECT_TYPE, ASPGRP, MEMBER_LOCK_TYPE, LOCK_STATE, LOCK_STATUS, LOCK_SCOPE, JOB_NAME, PROGRAM_LIBRARY_NAME, PROGRAM_NAME, MODULE_LIBRARY_NAME, MODULE_NAME, PROCEDURE_NAME, STATEMENT_ID, CURRENT TIMESTAMP AS TIMESTAMP FROM QSYS2.OBJECT_LOCK_INFO WHERE SYSTEM_OBJECT_SCHEMA='XXXXXX' AND SYSTEM_OBJECT_NAME='XXXXX'
In my example, I took the display file for my system signon.
Okay, now that I’ve written the basic query, I’m ready to start the procedure.
Input parameters
Library name
Object name
Object type
Analysis duration
Analysis output file library
Analysis file name
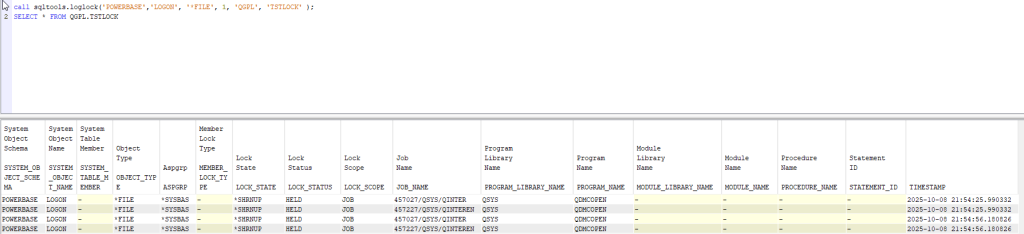
Procedure body: first, I create the template file (the create table with no data) that I will use later to make all the entries I see. After that, I cycle until I have reached the time required for the analysis passed as a parameter. During this cycle, I insert the data extracted directly with the select into the temporary file I created earlier. I chose to run the analysis every 30 seconds, but feel free to change this time. Once I have reached the time I set, I copy all the output to the file that I passed as a parameter to the procedure
Calling the procedure: you can call it from RUN SQL SCRIPTS/STRSQL/VS CODE/RUNSQL, here you can find an example, let’s consider that if you want to run this analysis for a long time, is better to submit it in batch.
You need to be carefull! The query that I wrote works on every release >=7.5 because of the where statement. As you can see it’s quite complicated, and this kind comparison in where clause is not supported on older release, so, as I said a lot of time, PLEASE STAY CURRENT.